개요
CI/CD를 위한 Pipeline 구성을 단계별로 학습한다.
목표
Gitlab의 Private Container Registry에서 이미지를 Pull & Deploy하는 과정을 학습한다.
여정
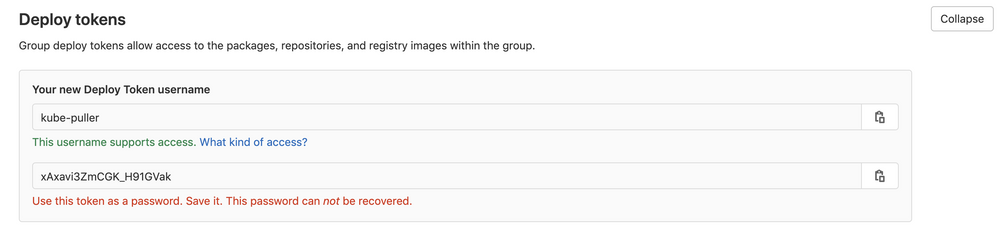
토큰 생성
깃랩 Repository에서
Settings > Repository > Deploy tokens
체크박스에서 필요한 권한을 Check한다(주로 Read 권한만 필요)

토큰 생성 결과는 한번만 확인할 수 있으므로 잘 저장해두자.
클러스터에 적용하기
간단한 방법
# 방법1 - Inline Command
# Gitlab은 registry.gitlab.com을 넣는다.
kubectl create secret \
docker-registry ${secret 이름} \
--docker-server=${이미지 저장소 URL} \
--docker-username=${docker 아이디} \
--docker-password=${docker 비번}

# 방법2 - Docker Login
# 도커 레지스트리 접속을 위한 로그인
# 도커 로그인 후 # /root/.docker/config.json 위치에 인증정보 생성됨
docker login registry.gitlab.com -u ${REGISTRY_USERNAME} -p ${REGISTRY_PASSWORD}

# 인증정보로 Secret 생성
sudo kubectl create secret generic nlp-test-secret --from-file=.dockerconfigjson=/root/.docker/config.json --type=kubernetes.io/dockerconfigjson
정석적인 방법 (사실상 위와 동일)
# 깃랩에 등록한 Deploy Token의 값을 대입
echo -n "${REGISTRY_USERNAME}:${REGISTRY_PASSWORD}" | base64
Z2l0bGFiK2RlcGxve...

# .dockerconfigjson 파일 생성
vi .dockerconfigjson
{
    "auths": {
        "https://registry.gitlab.com":{
            "username":"${REGISTRY_USERNAME}",
            "password":"${REGISTRY_PASSWORD}",
            "email":"${REGISTRY_EMAIL}",
            "auth":"${위에서 Base64로 생성한 값}"
    	}
    }
}

cat .dockerconfigjson | base64
ewogICAgImF1dGhzIj...
# Secret 파일 생성
vi test-secret.yaml
---
apiVersion: v1
data:
.dockerconfigjson: ewogICAgImF1dGhzIj...
kind: Secret
metadata:
creationTimestamp: null
name: test-secret
namespace: test
type: kubernetes.io/dockerconfigjson클러스터에 Private 저장소 이미지 배포하기
# Secret을 적용한 Deployment 작성
vi test-deployment.yaml
---
apiVersion: apps/v1
kind: Deployment
...
    spec:
			imagePullSecrets:
        - name: test-secret # 사용할 Secret 지정
      containers:
        - name: test-container
          image: registry.gitlab.com/${깃랩 Registry 주소}
          ports: ...

# 실행
kubectl apply -f test-deployment.yaml
생성 결과 검증하기
# Secret의 dockerconfigjson값을 가져와서 decode
kubectl get secret ${Secret 명칭} --output="jsonpath={.data.\.dockerconfigjson}" | base64 --decode

# 원래 형태의 JSON이 출력된다.
{
    "auths": {
        ...
    	}
    }
}
마무리
이번 시간에는 Private 저장소(Gitlab)에서 이미지를 가져오는 방법과이를 배포하는 방법까지 알아보았다.이는 CI/CD Pipeline의 가장 시작이 되는 부분이기도 하다.
다음 시간에는 이를 응용해서 CI/CD Pipeline을 발전시켜보도록 하자.
'DevOps' 카테고리의 다른 글
| Kubeflow 라이징 - GPU 워커노드 환경 구성 (0) | 2023.03.02 |
|---|---|
| Kubeflow 라이징 - ML Ops와 Service Mesh 훑어보기 (0) | 2023.02.24 |
| CKA 뽀개기 - Application Multi Container Issue (1) | 2023.02.21 |
| CKA 뽀개기 - Application Misconfigured (2) | 2023.02.20 |
| CKA 뽀개기 - Apiserver Misconfigured (0) | 2023.02.19 |